Authorization & Authentication
To access any endpoint on the Percolate API, you need to have a valid access token. An access token helps Percolate identify the caller and, in turn, the permissions they have to perform create, read, update or delete (CRUD) operations on any resource. Percolate uses the OAuth 2.0 standard which defines the way access tokens are granted to third-party applications.
The OAuth specification describes several ways for an application to grant third-parties access tokens. Percolate supports two grant types:
-Client Credentials (two-legged) Grant - where the third-party requests an access token to directly access Percolate’s API.
-Authorization Code (three-legged) Grant - where the third-party requests for an access token to act on behalf of an existing user. (This is in preference to third-party clients acquiring the user’s own login credentials which would be insecure).
Creating an API client allows you to get credentials that you can use to authenticate yourself to Percolate. Percolate only allows you to create API clients supporting either of the client credentials or authorization code grant types, but not both. Let’s take a look at creating these two kinds of API clients.
Creating an API client via the Percolate UI
Only a user with a System Admin or Developer user role can access this part of the Percolate UI.
To create an API client via the UI:
- We’ll go to Settings > Developer > API Clients.
- Once we click the New app button in the upper right corner, the New API client modal will appear:
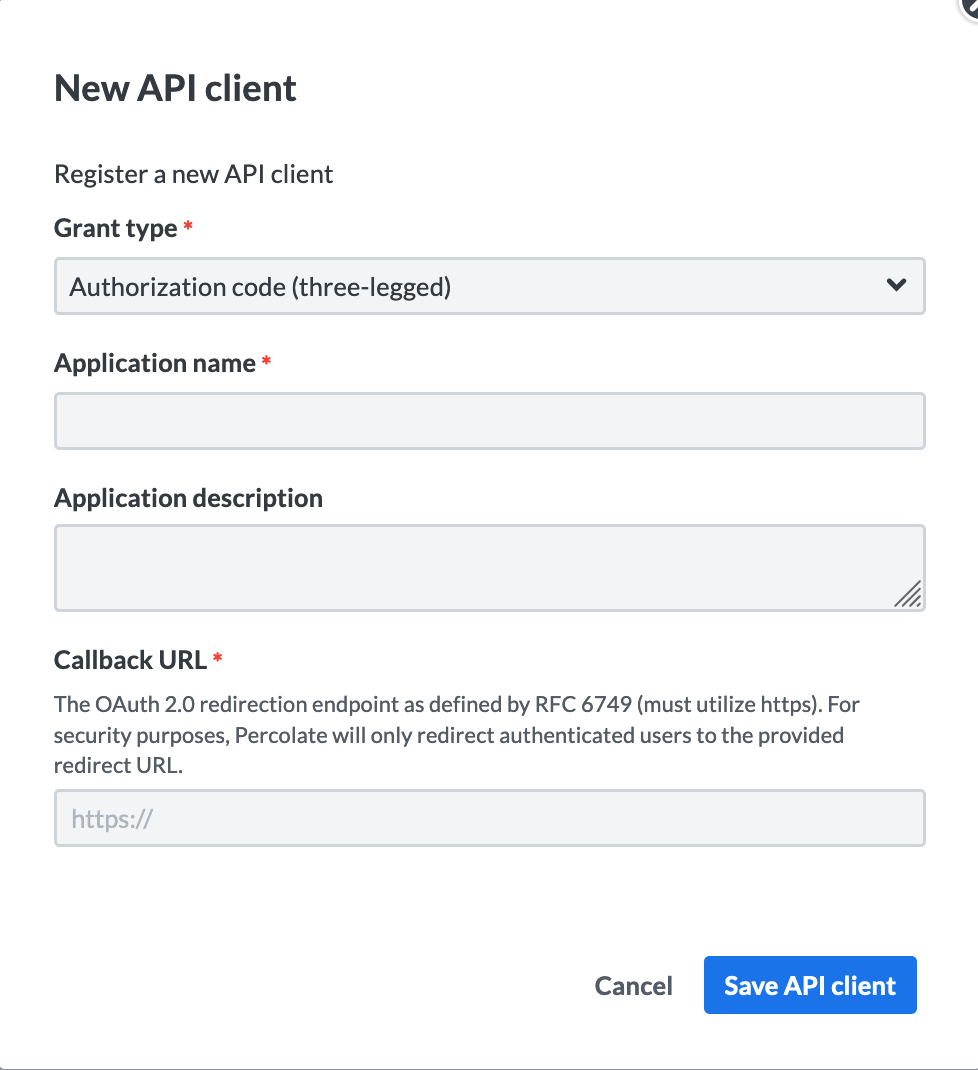
- Here, we’ll have a dropdown with the option of choosing between an API client supporting the client credentials grant or one that supports the authorization code grant.
For the authorization code grant, we’ll fill in the application name and optionally the description. We’ll additionally add a callback URL which is our app’s endpoint where Percolate will send the authorization code for a user once the user allows our application to access Percolate on their behalf.
For the client credentials grant, we’ll simply fill in our application’s name and optionally add a description.
4. Upon clicking the Save API client button, our API client will be created and will appear on the list of API clients.
Now that we’ve created an API client, let’s take a look at where to find the credentials.
Getting an API client’s credentials
To get the credentials for an API client in the UI:
- We’ll go to Settings > Developer > API Clients:
- We’ll search for our API Client from the list and click to open it:
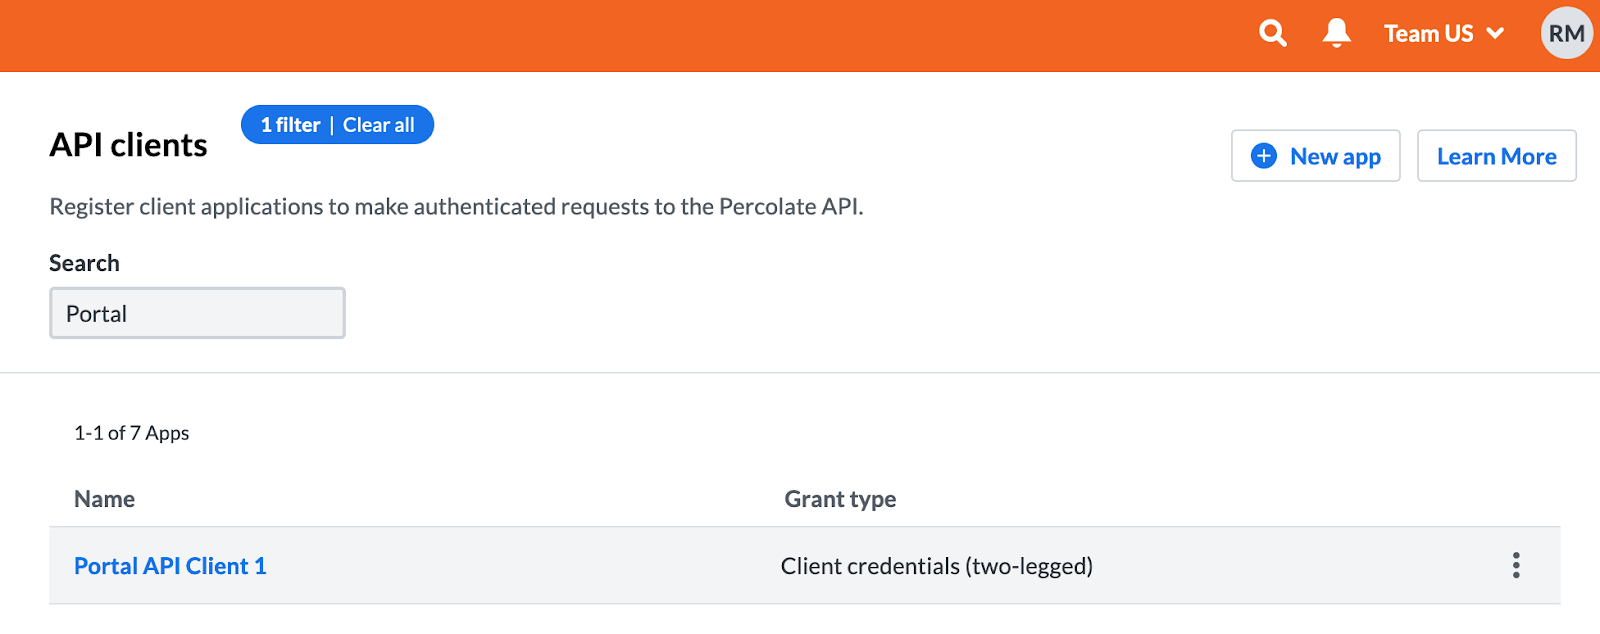
- We will be presented with the API client details view. The client ID is the long number found on the top left. In our case it’s 1163208182206485678. We’ll copy it:
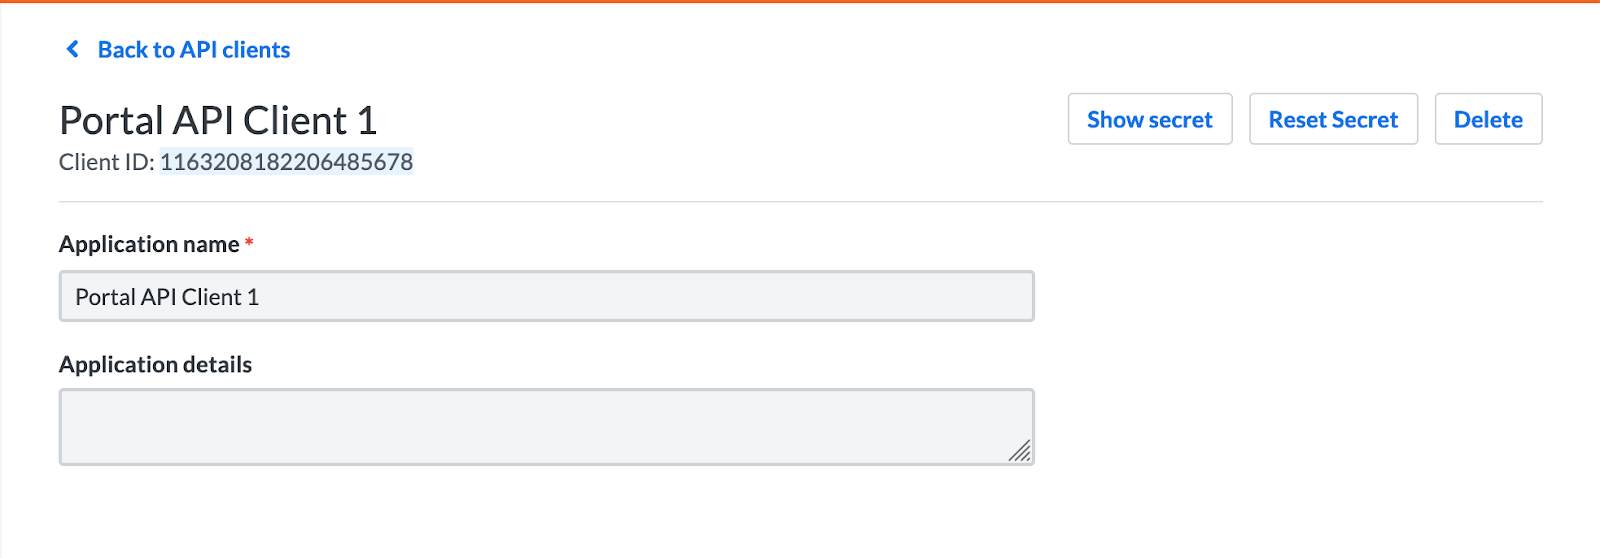
- The client secret is hidden and needs to be revealed. When you click on the Show secret button on the top right, a modal will pop up containing the secret value.
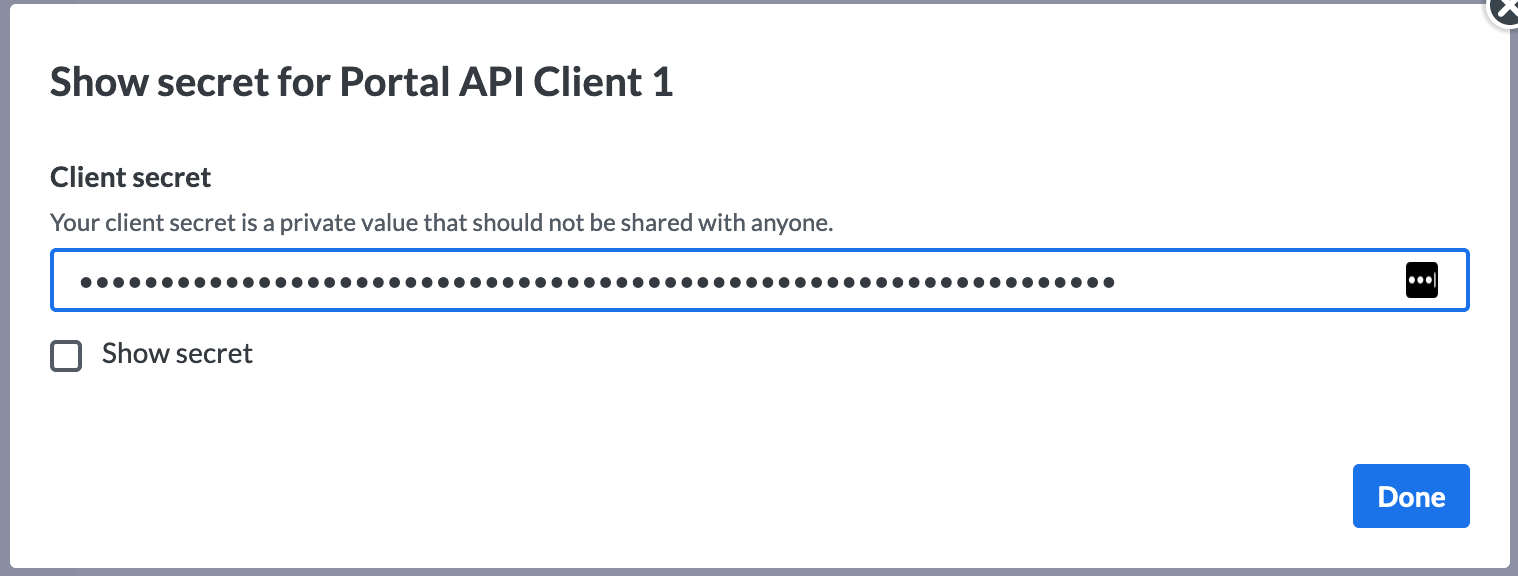
The client secret is a sensitive value and should be stored securely. In case you would like to invalidate the current secret and create a new one, click on the Reset Secret button on the top right of the API Client view.
The client ID and a client secret values form the client credentials that can be used to authenticate yourself to Percolate. We’ll use them when retrieving an access token in the next section.
Accessing the Percolate API via Client Credentials Grant
The client credentials or two-legged grant is used when you want your application to access the API directly. For this grant, you’ll make a request to Percolate with the client ID and secret and get an access token back.

We’ll be using the credentials from an API client that supports the client credentials grant.
Retrieving an access token
To retrieve an access token, we’ll make a request to the /auth/v5/token API using Postman.
- First, we’ll set the HTTP method to POST and fill the request URL input with https://percolate.com/auth/v5/token/
- We’ll then go to the Authorization tab and select the Basic Auth type.

- In the Username and Password field on the right, we’ll fill in the client ID “client:1163208182206485678” for the username and the client secret for the password.
For the username, we prefix the client ID number with “client:”
- We’ll then go to the Body tab and pick raw for the content type and select JSON on the dropdown on the right. (This sets the content-type header to application/json).
- For the body we’ll use:
{
    "grant_type": "client_credentials"
}
- Once we press the Send button and make the request, we get a response back that contains the access token.
In the response body, the access token is present in the access_token attribute and the expires_in field tells us how long (in seconds) the token will be valid for. This token will be valid for 30 days. The access token belongs to the user specified in the user_id field and for this type of API client, it will always be the user who created the API client.
The command line equivalent of the above would be:
curl -X POST \
  https://percolate.com/auth/v5/token/ \
  -H "Authorization: Basic $(echo -n 'client:1163208182206485678:<client-secret>' | base64)" \
  -H 'Content-Type: application/json' \
  -d '{
    "grant_type": "client_credentials"
}
You can test the token out by calling the v5/me endpoint.
Accessing the Percolate API via Authorization Code Grant
The authorization code or three-legged grant is meant to be used when you want to access the API on behalf of an existing Percolate user. For this grant:
- Your application redirects the user’s browser to the Percolate OAuth page where the user can approve your request to access Percolate on their behalf.
- Upon the user’s approval, Percolate redirects the user to your application with an authorization code in the query parameters.
- You can then exchange this authorization code with Percolate for the user’s access token.
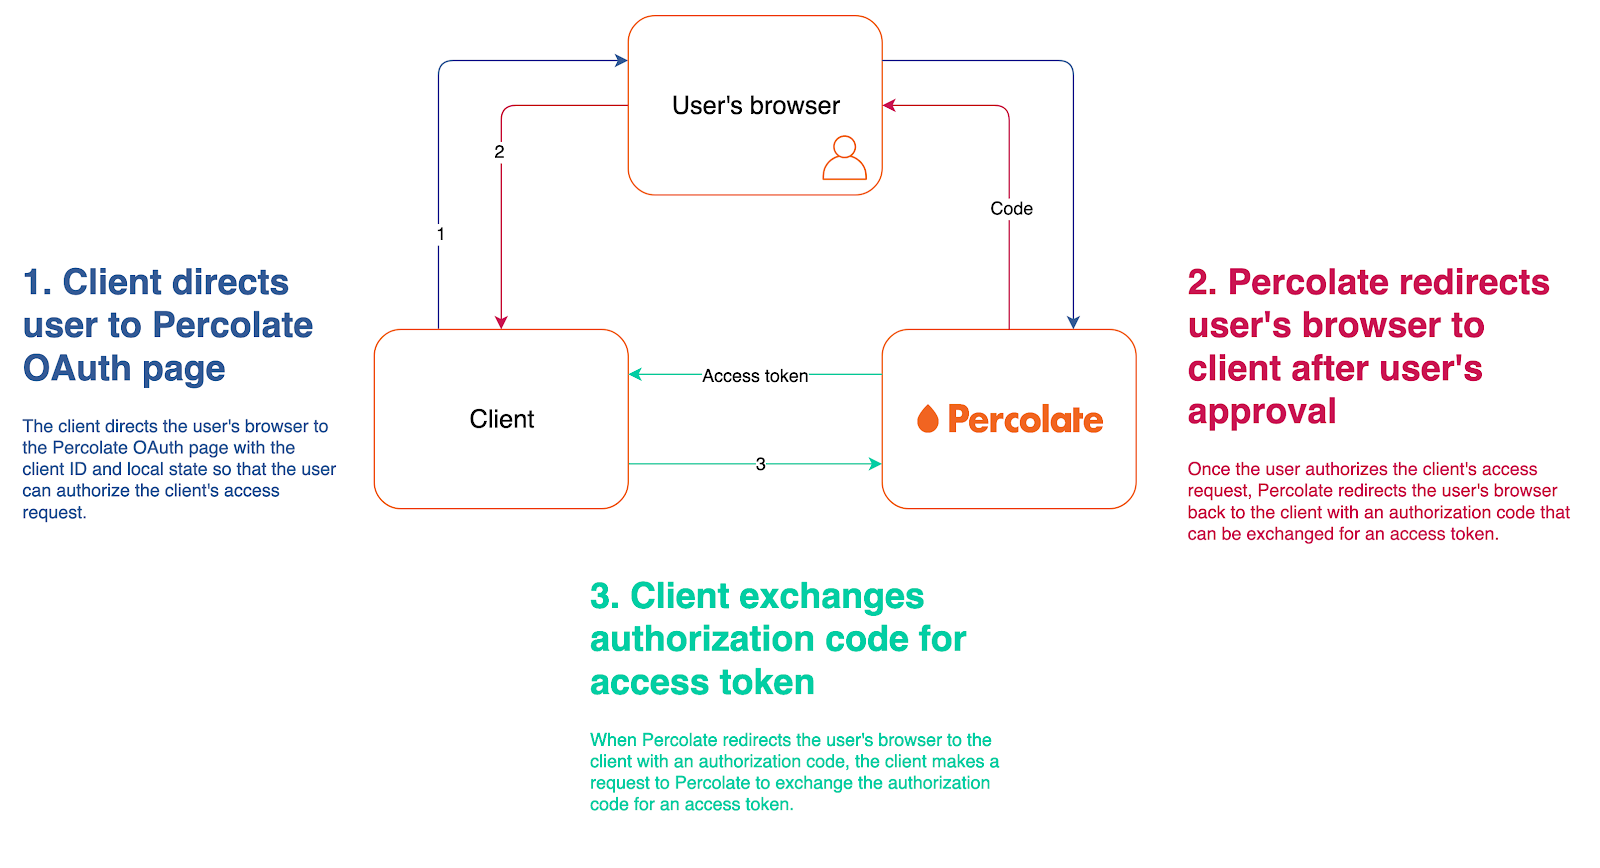
For the examples in this section, we will be using an API client that’s been enabled for the authorization code grant flow.
Directing the user to the Percolate OAuth page
For the first step of this grant, we need to direct the user to the Percolate OAuth page to get their authorization for your application to access their account. The request for this page needs to have the following format:
GET https://percolate.com/auth/oauth2?response_type=code&client_id=client:{client_id}&state={state}
The request is a GET to https://percolate.com/auth/oauth2 with the following query parameters:
-response_type - this must be set to “code” and describes the desired grant type.
-client_id - the identifier for your API client e.g. client:123456
-state - this is a unique non-guessable value that Percolate will send back in the request once the user authorizes your application for the purposes of preventing cross-site request forgery attacks against your application.
You can embed the link as a button on your application and once a Percolate user clicks on it, they will be directed to the Percolate OAuth page. Here the user will be shown all the permissions your application will receive upon their approval:
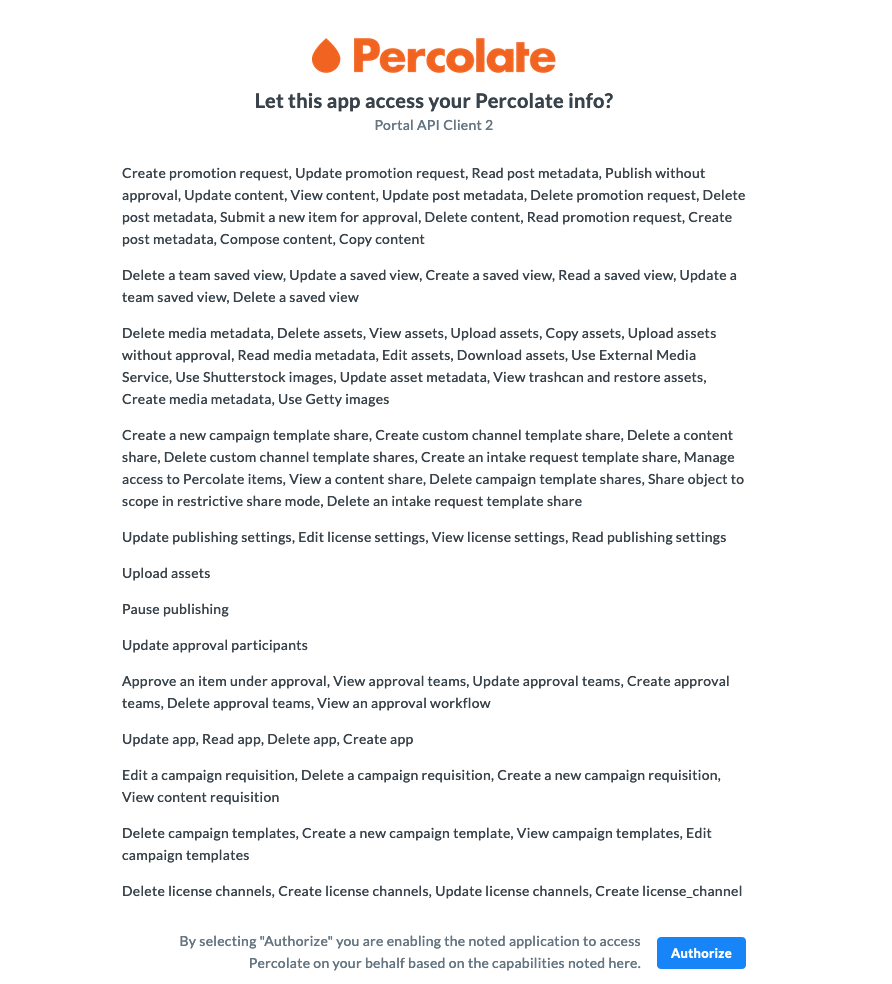
Upon clicking the Authorize button, Percolate will redirect the user’s browser to your application, the redirect URL having been specified when creating the API client. Percolate will redirect to your application with the following values in the query parameters:
-
code- The authorization code that can be exchanged for the user’s access token. It is only valid for 5 minutes from the time of issuance.
-state- the original state value you set when directing the user to the Percolate OAuth page.
-client_id- the identifier for your API client.
Exchanging the authorization code for an access token
To exchange the authorization code for the user’s access token we’ll need the API client ID and secret. Using Postman:
- We’ll set the HTTP method to POST and fill the request URL input with https://percolate.com/auth/v5/token/
- We’ll then go to the Authorization tab and select the Basic Auth type.

- In the Username and Password field on the right, we’ll fill in the prefix "client:" and the client ID for the username and the client secret for the password.
- We’ll then go to the Body tab and pick raw for the content type and select JSON on the dropdown on the right. (This sets the content-type header to application/json).
- For the body we’ll use:
{
    "grant_type": "authorization_code",
    "code": ""
}
- Once we press the Send button and make the request, we get a response back that contains the access token.
In the response body, the access token is present in the access_token attribute and the expires_in field tells us how long (in seconds) the token will be valid for. This token will be valid for 30 days. Once the access token expires, it can be exchanged for a new one using the refresh token as we will see in the next section. The access token belongs to the user who authorized your application to access their account and is identified in the user_id field.
In case the authorization code is invalid or has expired, we would get a 403 FORBIDDEN response with an error type in the body set to "invalid_grant:
{
"error": "invalid_grant"
}
The following is the command line equivalent of the authorization code exchange request is:
curl -X POST \
  https://percolate.com/auth/v5/token/ \
  -H "Authorization: Basic $(echo -n 'client:1163208182206485678:<client-secret> | base64)"  \
  -H 'Content-Type: application/json' \
  -d '{
    "grant_type": "authorization_code",
    "code": "82IvjoHIPeh_P3cWDZ4wfS1SJutzt-w2YwPQBdV8f8WwJ5orSm7kEJqg95j8YjWQ"
}'
Refreshing an access token
The refresh_token returned in the response body returned upon exchanging the authorization code for an access token can be exchanged for a new access token after the previous one has expired. The refresh token will only be valid for 14 days after the access token expires.
Having a refresh token means that you wouldn’t need to have the user authorize your application all over again. Let’s go ahead and fetch a new access token with the refresh token we got. Using Postman:
- We’ll set the HTTP method to POST and fill the request URL input with https://percolate.com/auth/v5/token/
- On the Authorization tab, we’ll select the Basic Auth type and fill in the Username and Password field on the right with the client ID and secret.
- After selecting raw and JSON for the body we’ll add this:
{
    "grant_type": "refresh_token",
    "refresh_token": "refresh-token-value"
}
- Once we press the Send button and make the request, we get a response back that contains the new access token.
The response body is similar to the one returned for the authorization code exchange. The new access token is returned alongside a new refresh token. The previous refresh token becomes invalid since it can only be used once. The refresh token would also be rendered invalid if the user who owns it disables the access token.
The command line equivalent for the refresh token request is:
curl -X POST \
  https://percolate.com/auth/v5/token/ \
  -H "Authorization: Basic $(echo -n 'client:1163208182206485678:<client-secret> | base64)"  \
  -H 'Content-Type: application/json' \
  -d '{
    "grant_type": "refresh_token",
    "refresh_token": "refresh-token-value"
}'
Testing out an access token
To test out an access token, we’ll make a call to the v5/me API endpoint, which will respond with the details of the user that owns the given token. On Postman:
- We’ll set the HTTP method to GET and fill in https://percolate.com/api/v5/me in the request URL input.
- We’ll then go to the Authorization tab and select the Bearer Token auth type. We’ll place the access token in the Token input field to the right and click on Send to make the request.
- We should get a 200 OK response containing the user’s details. This tells us that the token is valid.
The command line equivalent of the request to test out the access token is:
curl -X GET \
  https://percolate.com/api/v5/me \
  -H 'Authorization: Bearer <access-token-value>' \
An access token may become invalid once it expires, the user revokes the grant or a new access token is issued for the user which would invalidate any existing one.
If an access token is invalid, we would get a 401 UNAUTHORIZED response. In this case, we would need to make the client credentials grant request again in the case of a two-legged app or use the refresh token for a three-legged app.
Troubleshooting & FAQ
Common /auth/v5/token API errors:
-
invalid_request- this error occurs when the structure of your request headers or body is invalid. e.g. When the “client:” prefix is omitted from the client ID value or there is a missing key in the JSON body.
-invalid_grant- this error occurs when the authorization code is invalid/expired, the API client being used doesn’t support the given grant type or the refresh token is invalid/expired.
-invalid_client- this error occurs when the client cannot be authenticated. This could be due to an invalid/unknown client ID and secret or an unsupported HTTP authentication method being used.
I receive a 401 Unauthorized Error response when I use an access token on any endpoint.
This means the given access token is invalid, has expired or been revoked and a new one needs to be retrieved.
Updated almost 6 years ago
